
How to Measure, Fit, and Break In Dog Boots (With Troubleshooting)
How to Measure, Fit, and Break In Dog Boots (With Troubleshooting)
Boots that twist, pop off, or rub can turn a simple walk into a struggle. The difference is almost always in the measurement, fit, and break-in process—not the dog. This focused tutorial shows precisely how to trace, size, fit test, and gently break in boots, then troubleshoot slippage, dewclaw irritation, and sensitive paws.
If you have already reviewed hazards and boot types, this article builds on that foundation with a step-by-step dog boot sizing guide and practical at-home checks that prevent discomfort and reduce returns.
Before You Start: When Dogs Need Boots and How Fit Affects Comfort
Boots protect paws against heat, ice, debris, and medical exposures, but accurate sizing and fit are essential to ensure natural gait and skin health. For broader context on hazards and boot categories, visit our main paw protection guide. The steps below focus on how to measure and fit dog boots with precision, then break them in so your dog moves confidently from the first week.
Common use cases: injury, allergies, hot pavement, ice, trail debris
Boots shield bandages post-injury, block allergens, buffer hot pavement and ice melt, and guard against thorns and sharp scree. In daily life, they reduce abrasion from rough sidewalks; on trails, they prevent cuts, bruising, and pad wear.
Why sizing accuracy matters for gait, grip, and skin health
Improper fit alters weight distribution and paw contact, which can change ground reaction forces and balance. Studies show canine boots affect kinetic parameters and require careful habituation to maintain natural gait and traction[1][2].
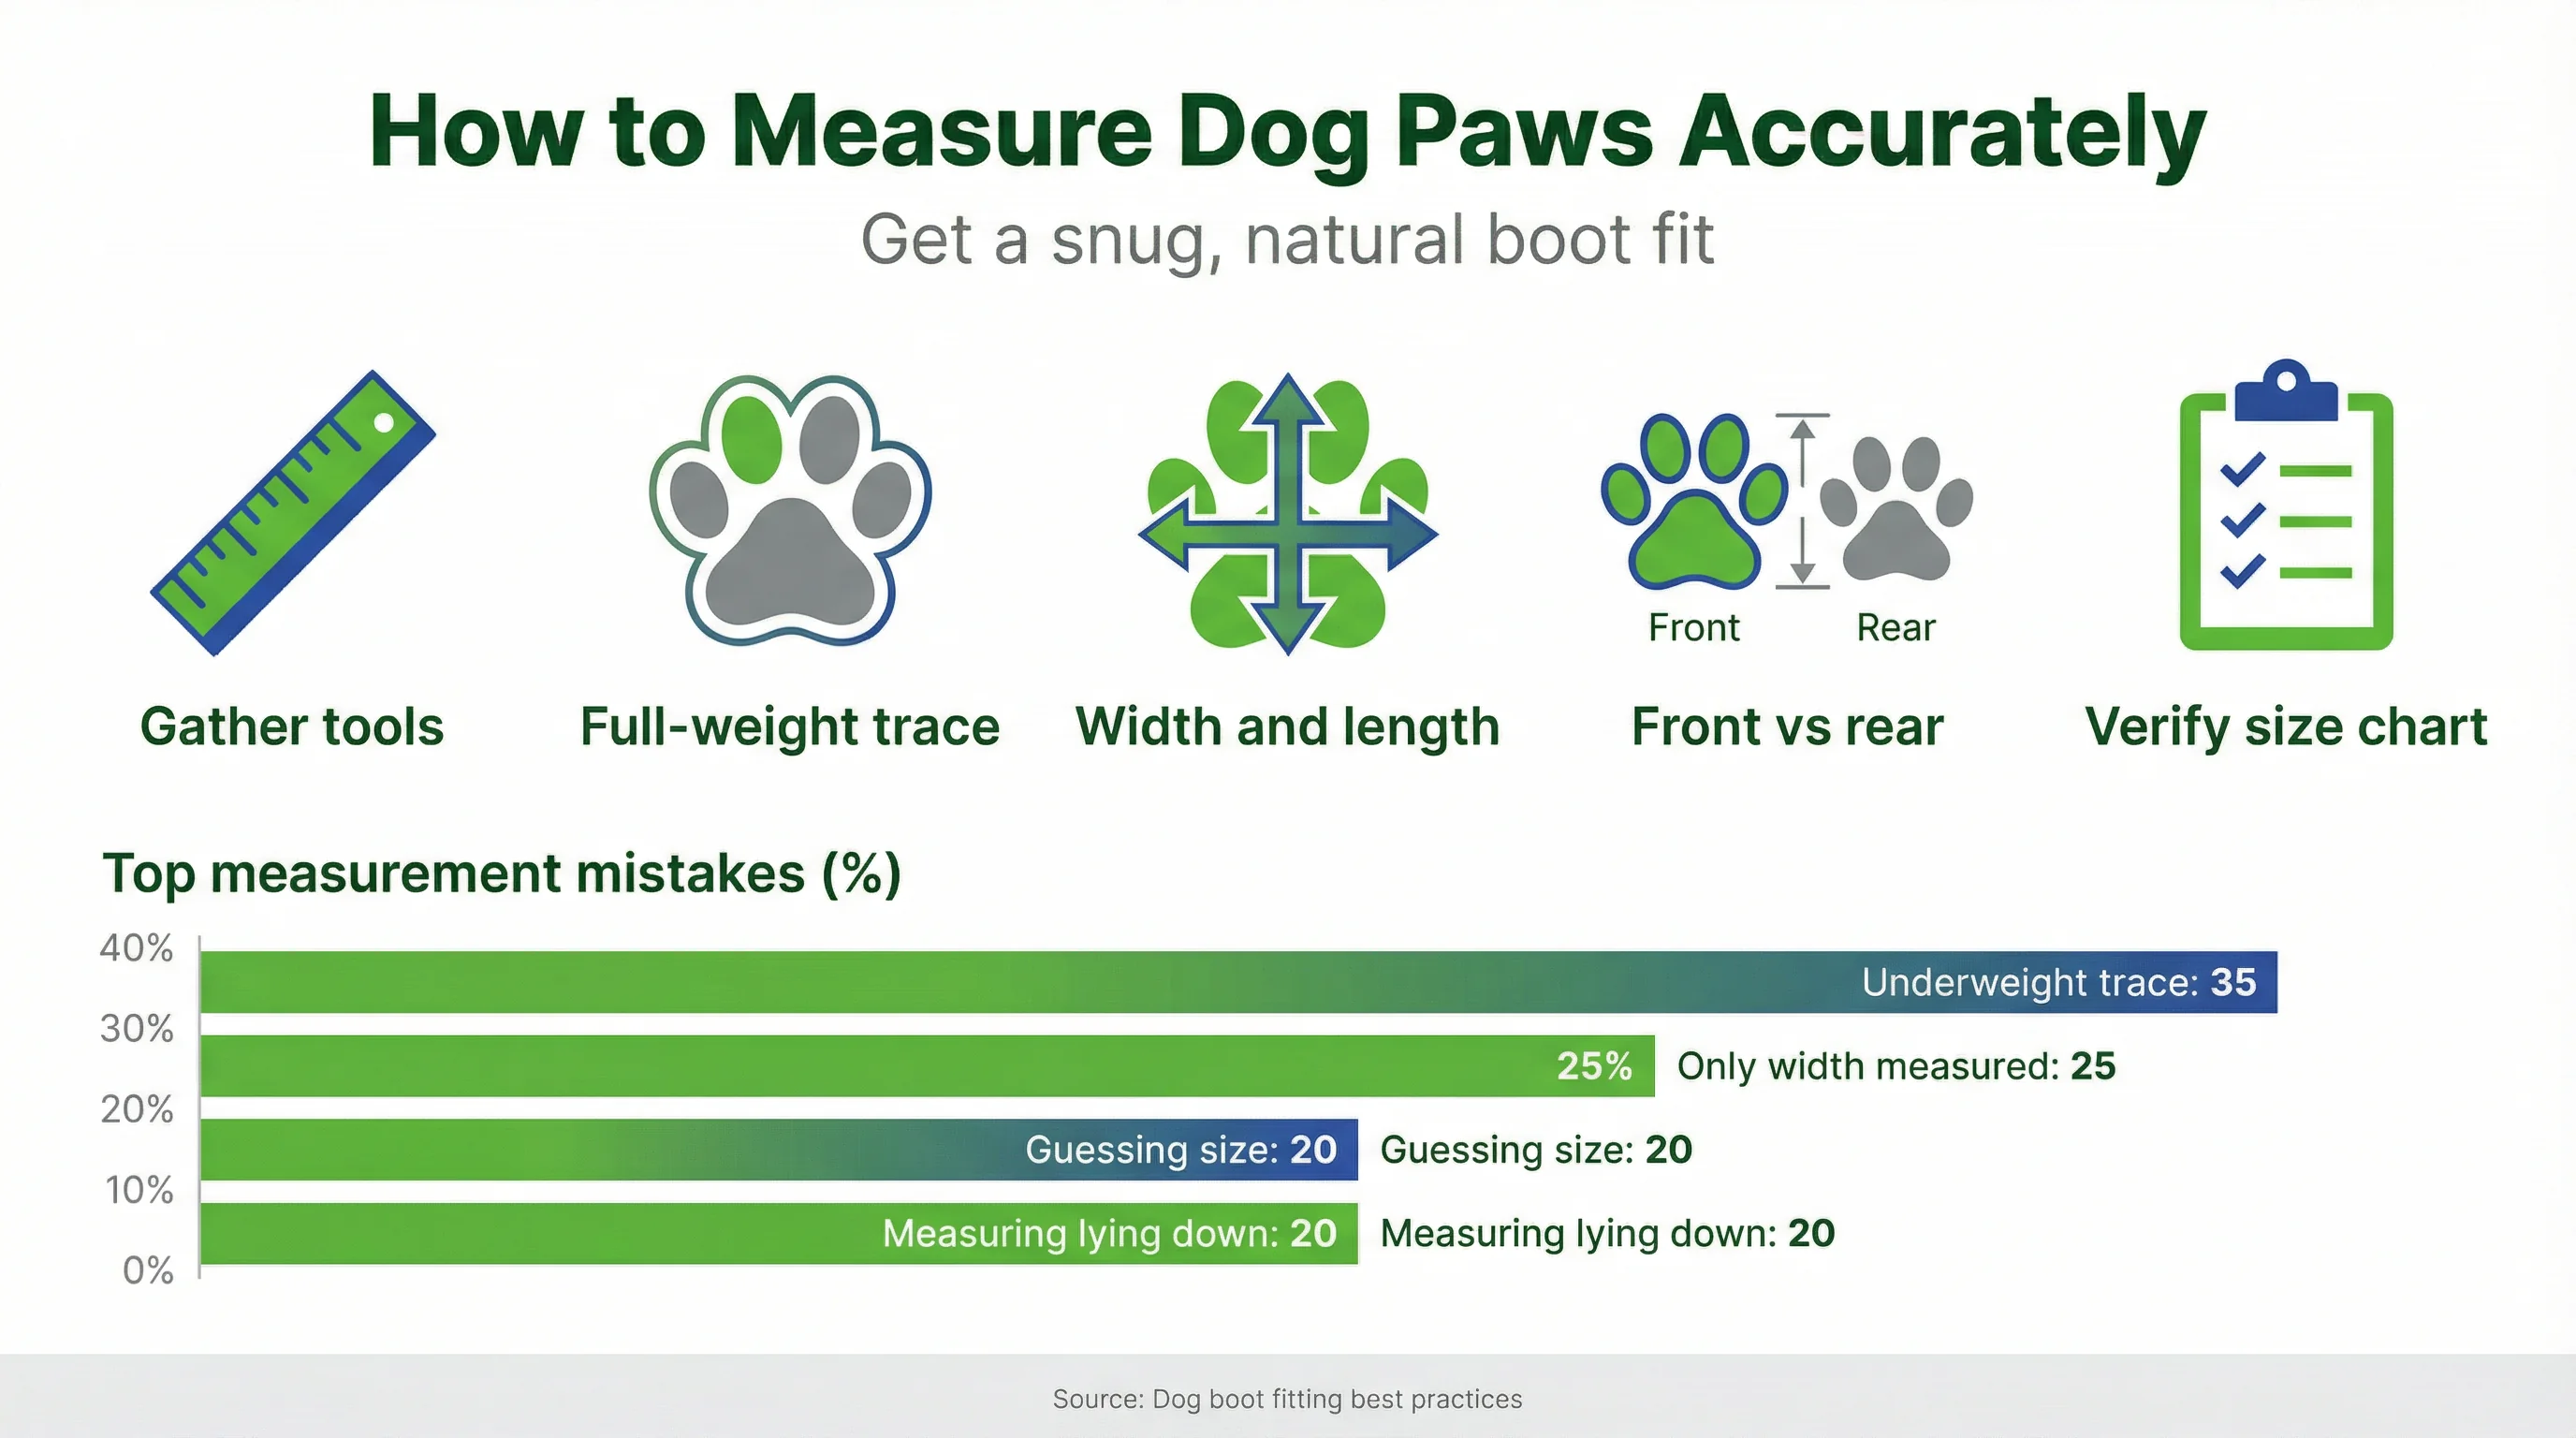
Step 1: Measure Your Dog’s Paws Accurately
Gather plain paper, a pencil, a rigid ruler, and small treats. Work on a non-slip floor so your dog can fully bear weight for precise width and length. This section explains how to measure dog paws for boots and convert to size charts accurately.
Paw tracing method: width vs. length and weight-bearing measurements
Place paper on the floor and guide one paw onto it while your dog stands. Trace around the paw at full weight. Mark the widest point (across the metacarpal/metatarsal pads) and the longest toe-to-heel point. Repeat 2–3 times for consistency.
Using a ruler or tape: front vs. rear paw differences
Measure the width and length marks in millimeters for accuracy. Front paws are often wider than rear paws. Measure at least one front and one rear paw; record the larger width to determine the primary boot size for each set.
Converting measurements to brand size charts
Most boot brands size by width; some account for length. Compare your measurements to each brand’s chart. If between sizes, select the option that’s snug in width for traction—unless you expect bandaging or swelling, in which case size up.
Step 2: Fit Test at Home
Once boots arrive, perform a deliberate fit test indoors. A correct fit feels secure at the wrist/hock, clears the dewclaw, and allows toe splay. Early, careful adjustments prevent dog boots slipping off or rubbing when you transition outdoors.
Proper sock/liner use for medical or sensitive paws
Use thin, moisture-wicking liners or medical socks to reduce friction, protect healing skin, and guard against adhesive sensitivity. Liners also help fill tiny gaps if a size is close, improving stability without overtightening straps.
Fastening technique: snug, not tight—checking circulation and dewclaw clearance
Position the boot so the toes reach the front but are not compressed. Fasten the strap above the carpal pad. Aim for snug, not tight—you should fit a fingertip under the strap and see no pressure on the dewclaw. Check capillary refill.
Walk test on different surfaces to spot rubbing or rotation
Let your dog walk 30–60 seconds on tile, mats, and outdoors. Watch for rotation, toe curling, or high-stepping. Minor gait adjustments are normal, but persistent twisting may indicate oversizing or insufficient strap height[1][2].
Step 3: Break In Dog Boots Gradually
Even perfectly sized boots benefit from a short acclimation plan. Research suggests dogs adapt to footwear over time, underscoring the value of a structured break-in schedule that pairs comfort checks with positive reinforcement[2].
Short sessions and positive reinforcement schedule (days 1–7)
Start with 5–10 minutes indoors and treat frequently. Add 5 minutes per session over a week. Keep excitement low at first; reward calm standing and smooth steps. Progress only if there’s no rubbing, rotation, or moisture buildup.
| Day | Session Length | Goal |
|---|---|---|
| 1–2 | 5–10 min indoors | Comfort with donning/doffing; no rubbing |
| 3–4 | 10–15 min mixed surfaces | Stable gait; minimal rotation |
| 5 | 15–20 min outdoors | Consistent traction; normal stride |
| 6–7 | 20–30 min walks | Confident movement; dry, healthy skin |
Flexing soles and warming closures for better conformity
Before each early session, hand-flex the soles and gently warm hook-and-loop closures with your hands. This helps materials contour to the paw and limb, reducing initial stiffness and improving closure grip.
Post-walk inspection: fur matting, hotspots, and moisture
After every session, check for wet fur, matting at the strap, and pink skin. Ensure nails are trimmed to prevent toe pressure. Dry boots fully between uses to avoid odor and skin maceration.
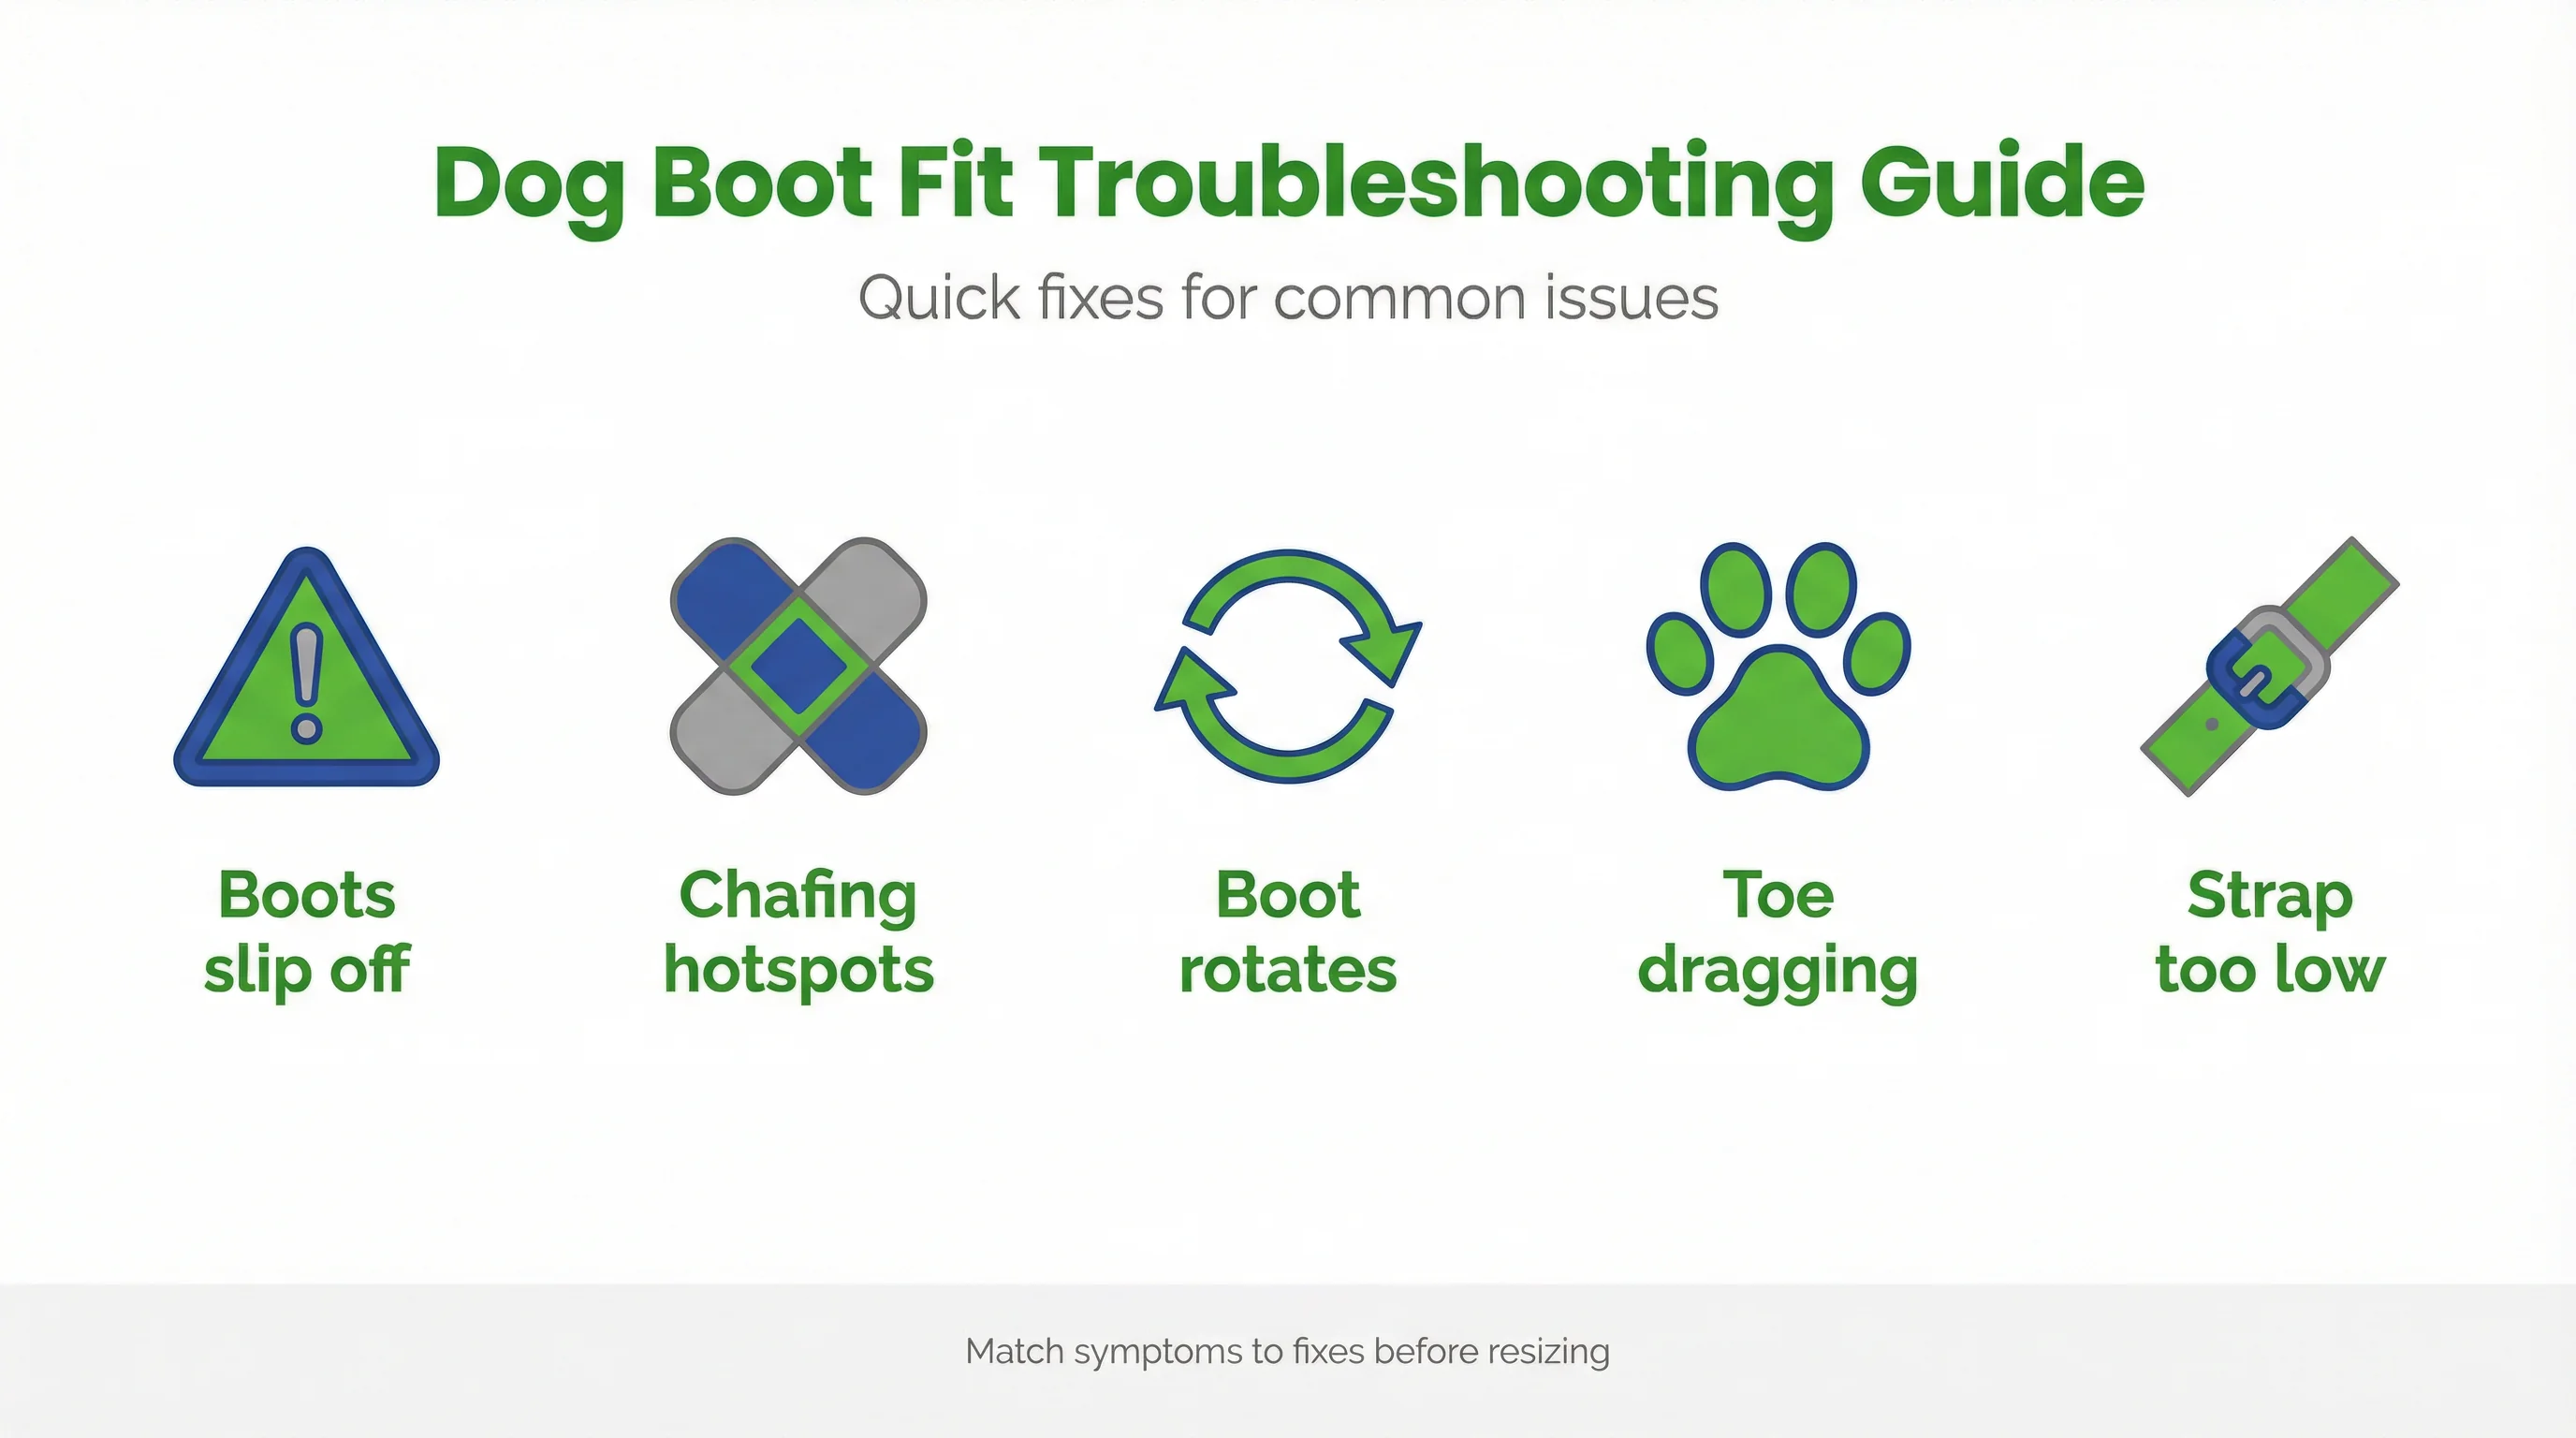
Troubleshooting Common Fit Problems
When issues arise, diagnose cause before changing size. Match the symptom to one of the scenarios below, then apply the targeted fix. If two issues coexist, resolve rotation first, then address pressure points.
Boots slipping off or rotating
Most dog boots slipping off stem from oversizing or a strap placed too low. Re-measure and ensure the strap seats above the wrist/hock. Add a thin liner for grip and recheck gait on tile and grass[2].
Dewclaw irritation and pressure points
For optimal dog dewclaw boot fit, avoid wrapping directly over the dewclaw. Position closures slightly above or below it, use soft, broad straps, and check skin daily. A thin, breathable pad under the strap can offload pressure.
Sensitive paws, post-injury bandages, and swelling changes
When managing bandages or fluctuating swelling, consider two sizes (one for dressing days) or adjustable wraps. See guidance on Post-Injury and Surgical Recovery: Using Medical Booties, Wraps, and Calm Support for elastic leg wraps and medical booties. For wound hygiene and safe dressing changes, review Paw Pad First Aid: HOCl Wound Care, Bandaging, and Booting Protocol.
Grip issues on tile, snow, or wet surfaces
Check tread wear, debris lodged in lugs, and fit. Overly long boots can reduce toe splay and traction. Clean soles, ensure snug width, and match tread to the surface; snow often needs deeper lugs than indoor tile.
Care, Cleaning, and Maintenance for Longer Boot Life
Clean, dry boots fit better, smell better, and last longer. For complete instructions on drying, deodorizing, and inspection, see our Boot care and maintenance best practices. Consistent care also protects skin integrity by minimizing moisture and grit against the paw.
Drying and odor control after muddy or wet outings
Rinse soles to remove salt and grit, then blot linings with a towel. Air-dry boots open and upside down. Avoid high heat. For odor, use pet-safe sprays and ensure boots are fully dry before storage.
Checking closures, seams, and treads between uses
Inspect hook-and-loop for lint and clean it with a fine comb. Look for seam fray, delamination, or thinning treads. Early repairs—re-stitching or replacing straps—extend boot life and preserve secure fit.
When to replace vs. repair components
Replace boots when soles are smooth, the upper fabric is torn, or closures no longer hold after cleaning. Minor strap wear is repairable; outsole baldness or delamination is not, especially for active outdoor use.
Safety and Vet Tips for Special Cases
Rehabilitation teams often integrate footwear into recovery plans, emphasizing coordination with your veterinarian or canine rehab professional to ensure proper protection without impeding therapy goals[3]. Handlers in sport and high-intensity activities should likewise use well-fitted gear and progressive conditioning to limit injury risk[4].
Post-surgery boot protocols and dressing changes
Follow your clinician’s timeline for bandage changes and icing. Keep boots clean and dry, and replace liners frequently. For sterile technique and HOCl wound cleansing guidance, see Paw Pad First Aid: HOCl Wound Care, Bandaging, and Booting Protocol.
Allergy, dermatitis, and hot spot considerations
Allergic skin benefits from breathable liners and brief, dry sessions to prevent maceration. Reduce exposure to triggers and keep closures off compromised skin. Learn more in Allergies, Hot Spots, and Itchy Paws: Protect, Soothe, and Break the Cycle.
Seasonal hazards: heat, ice melt, and trail abrasion
Measure and fit carefully before seasonal extremes. In summer, test boots on cool surfaces first. In winter, rinse salt after walks. On trails, inspect for embedded debris that can push fabric into the paw.
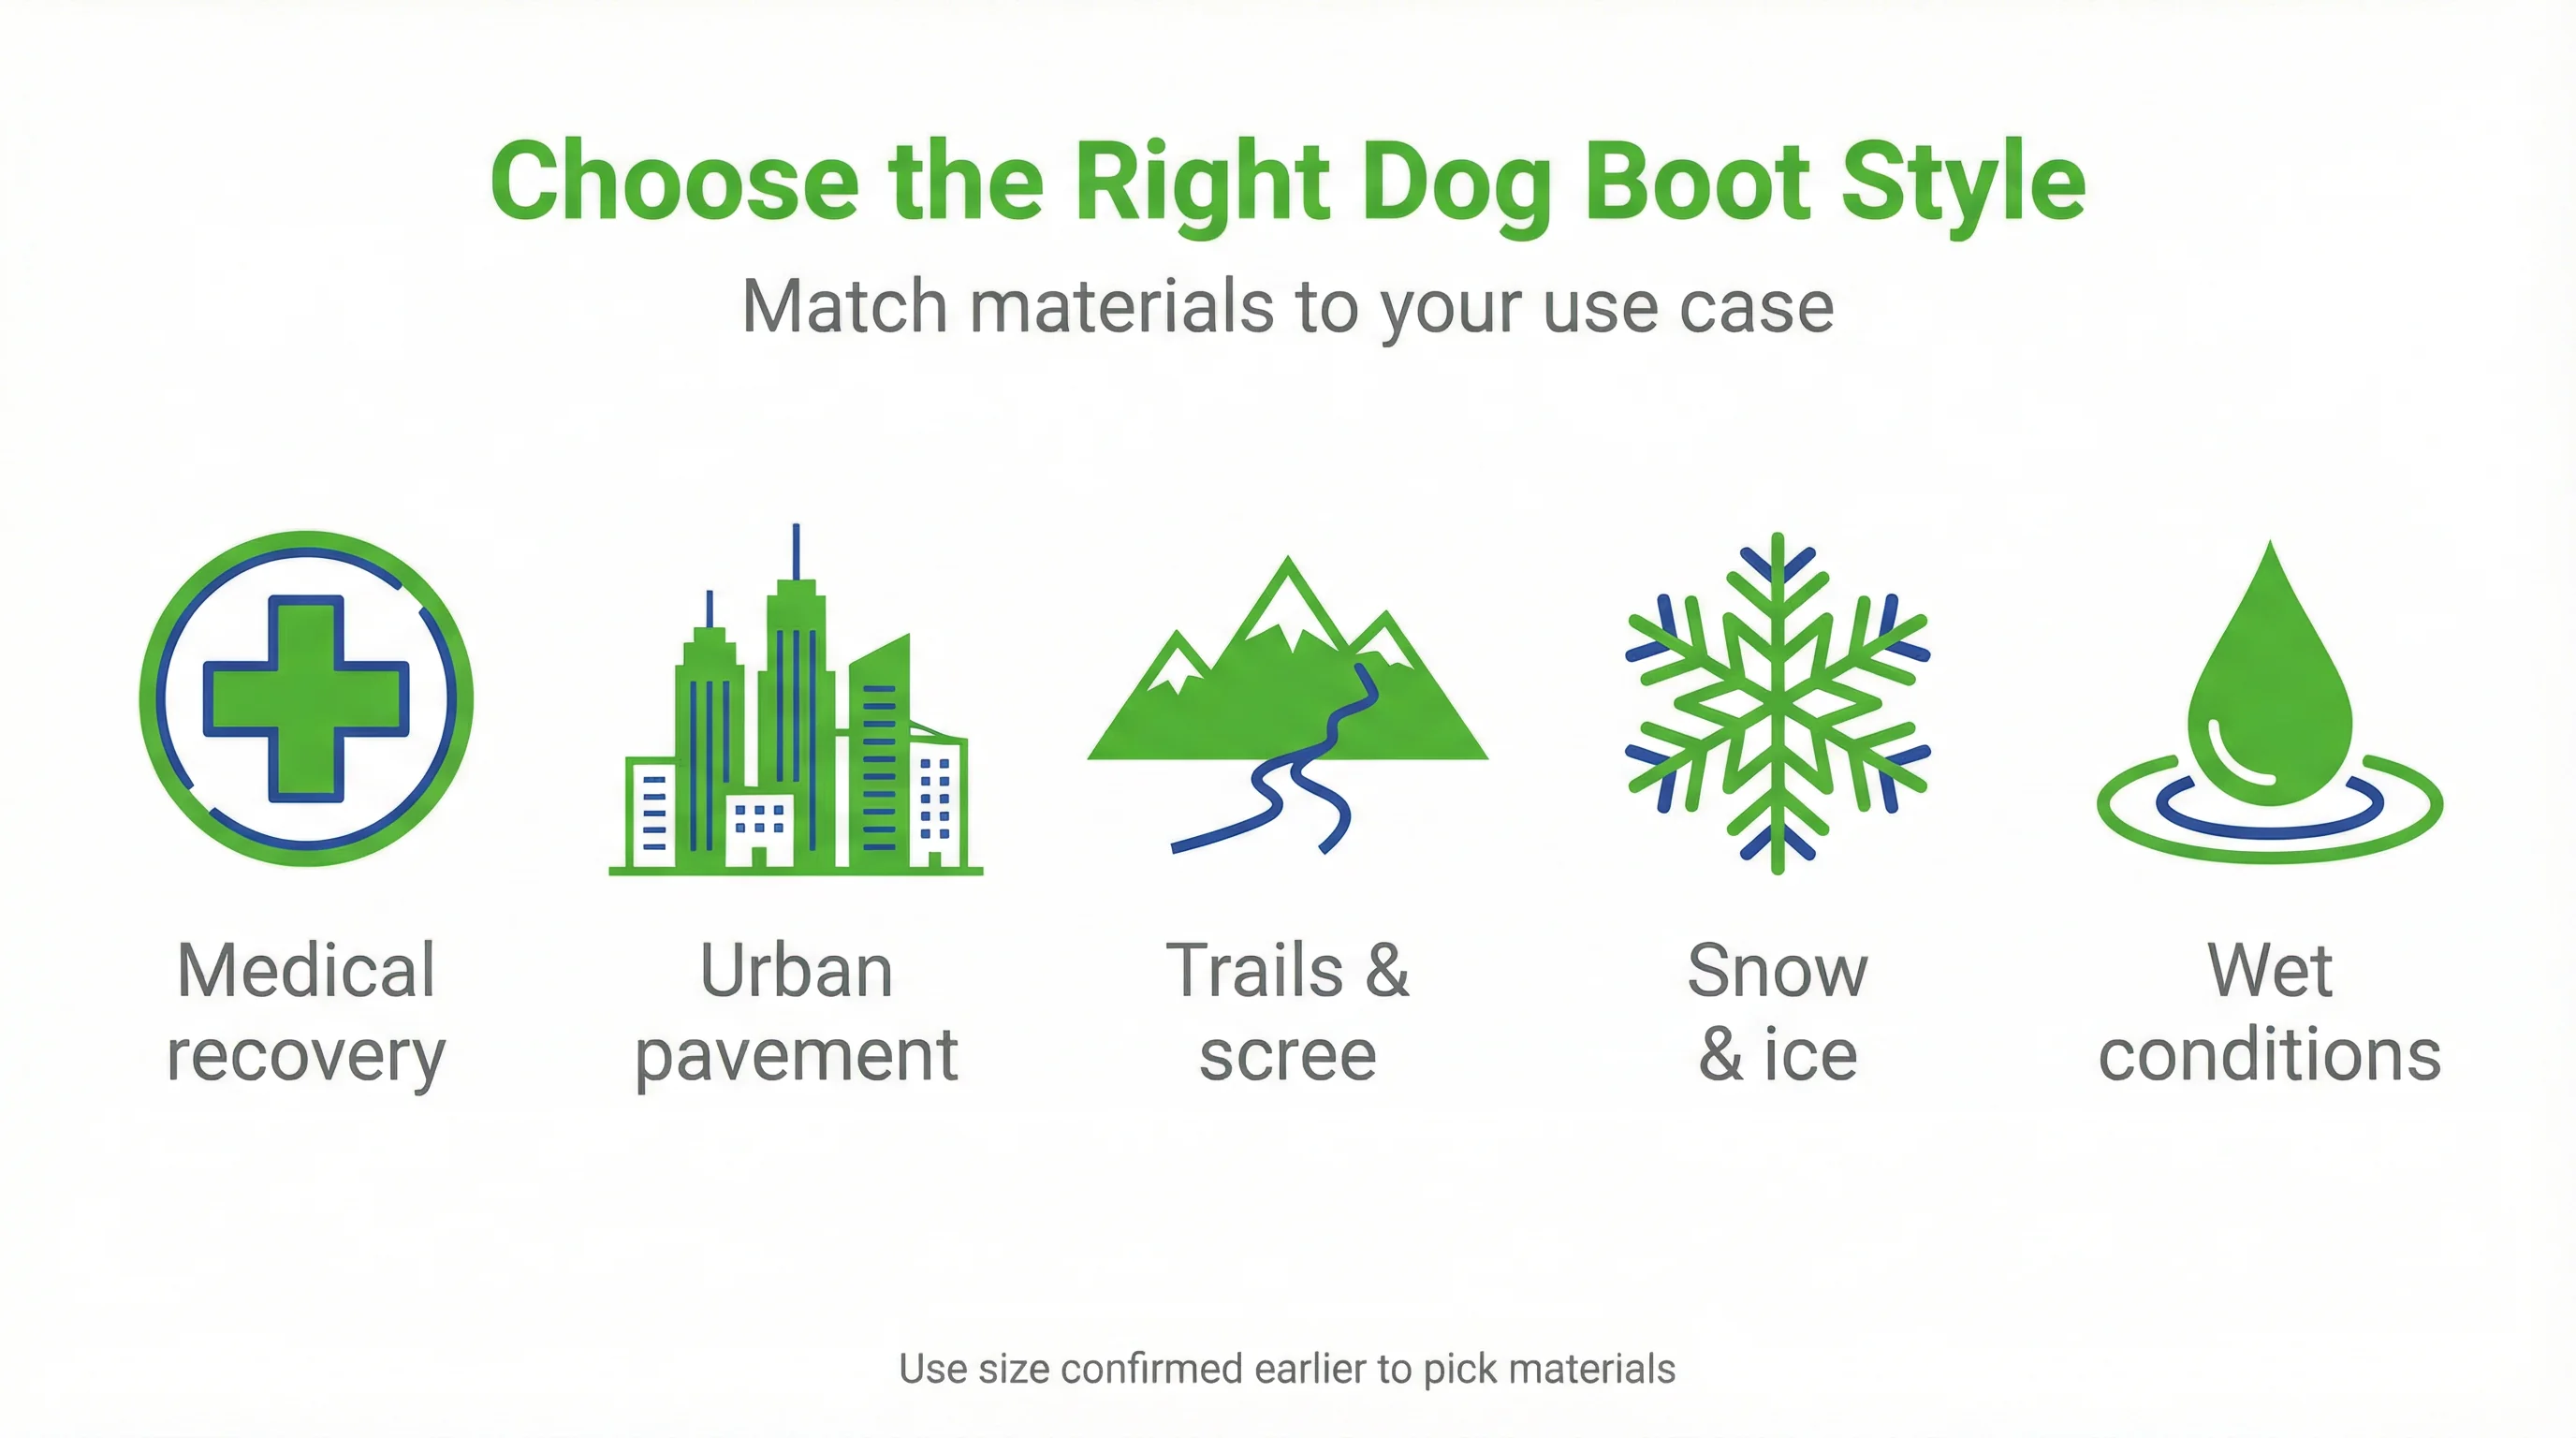
Choosing the Right Style Once You Know Your Size
After confirming measurements, match boot materials to your use case. Medical scenarios call for soft, breathable uppers; rugged adventures benefit from durable soles and structured support. Secure closures reduce rotation and improve safety.
Medical vs. everyday outdoor boots: materials and support
Medical boots prioritize breathability and gentle compression over deep lugs, while outdoor boots emphasize traction, abrasion resistance, and weatherproofing. Choose features that suit the activity rather than “one-boot-for-everything.”
Matching tread and closure style to activity level
For urban walks and varied weather, a waterproof, breathable upper with a molded rubber sole provides dependable grip. Many pet owners find Urban Walkers III helpful for this task when consistent traction and visibility matter.
Mapping sizes across brands and front/rear paw sets
If brands allow mixing sizes, select wider fronts and slimmer rears based on your measurements. Confirm width tolerances and strap lengths to accommodate fur and seasonal liners without compromising circulation or toe splay.
Frequently Asked Questions
How do I measure my dog’s paw for boots?
Place the paw on paper while your dog stands, trace at full weight, and measure the widest width and longest length. Repeat for both front and rear paws and use the larger measurement when selecting a size.
Why do my dog’s boots keep slipping off?
Boots slip when they’re too large, not fastened high enough above the carpal pad, or when fur reduces friction. Re-measure, tighten to snug (not tight), consider a liner or wrap, and test on multiple surfaces.
How long does it take to break in dog boots?
Most dogs adjust within 3–7 days using short, positive sessions. Flex the boot and start with 5–10 minutes, gradually increasing time while checking for rubbing or moisture.
How can I protect dewclaws from irritation?
Choose boots with soft, broad closures and avoid wrapping directly over the dewclaw. Add a light liner or protective pad and verify you can slip a finger under the strap without pressure on the dewclaw.
Are different sizes needed for front and rear paws?
Often yes—front paws are commonly wider. Measure both sets and select sizes accordingly if the brand allows mixing front and rear sizes.
Conclusion
Fitting dog boots well is a precise, repeatable process: accurate paw tracing, careful conversion to a size chart, thoughtful strap placement, and a structured break-in plan. With these steps—and quick troubleshooting for slippage, dewclaws, and sensitive skin—you will improve comfort, gait, and durability. Use this tutorial as your practical companion to measuring and fitting boots, and revisit it whenever you introduce a new season, surface, or activity.
References
- B Bieber et al. (2022). Changes in ground reaction forces and center of pressure parameters of paws when wearing dog boots in dogs. Frontiers in veterinary …. View article
- K Shorter et al. (2019). Ground force kinetic adaptations associated with canine boots. Biologia Futura. View article
- A Bergh et al. (2025). The Practice of Physical Therapy and Models of Collaboration in Canine Rehabilitation. Canine Sports Medicine and …. View article
- A Demeco et al. (2025). Injury, Risk and Training Habits Among Dog Agility Handlers: A Cross-Sectional Study. Journal of Functional …. View article


