
When and How to Use Elastic Leg Bandages on Dogs
When and How to Use Elastic Leg Bandages on Dogs
An elastic leg bandage for dogs can stabilize minor wounds and control swelling without adhesives. Used correctly, it protects healing tissue while allowing daily activity.
This matters because poor wrapping may restrict blood flow or delay recovery. In this guide, you will learn when a washable dog leg wrap makes sense, how to apply layers with non-adhesive gauze, how to check dog leg bandage tension, and when to rotate dog bandage scheduling for safe, effective care at home.
Scenario: Minor leg wounds and post‑injury support at home
Home bandaging is best for small, clean wounds or light support between veterinary visits. Your goal is protection, gentle compression, and comfort.
When an elastic wrap with non‑adhesive gauze is appropriate
Use a washable elastic leg wrap for superficial cuts, mild abrasions, or minor post-injury swelling when the dog still bears weight. Choose non-adhesive gauze for dogs to avoid sticking to the wound bed. A canine wound care bandage may support small incision coverage when your veterinarian allows light activity. Keep expectations modest: aim for gentle protection, not rigid immobilization.
When to avoid home bandaging and seek veterinary care
Skip home wrapping for deep punctures, heavy bleeding, exposed bone or tendon, severe lameness, or suspected fractures. Avoid elastic materials if toes are already cool, numb, or swollen. Excess pressure may compromise circulation and cause ischemic injury with elastic materials, especially on tapered limbs[1]. If your dog chews incessantly, shows worsening pain, or the wound emits foul odor, call your veterinarian.
Quick decision guide
Use these fast rules to choose the right action for common scenarios. When uncertain, err on the side of less compression and earlier veterinary input.
If X situation, then Y action (5–7 fast rules)
- If the wound is clean, shallow, and not actively bleeding, apply non-adherent gauze with light elastic support.
- If bleeding persists beyond five minutes with pressure, elevate the limb and seek veterinary care immediately.
- If toes look puffy, cold, or discolored after wrapping, remove the bandage and rewrap with less tension.
- If your dog licks or scratches the bandage, add a protective boot or collar and reassess fit and comfort.
- If the wrap slides within an hour, reapply with extra padding and even, overlapping layers for grip.
- If outdoor walks are planned, cover with a waterproof boot and change the bandage after returning.
- If you cannot check the bandage every few hours on day one, postpone wrapping and consult your veterinarian.

Step‑by‑step: Apply a washable elastic leg bandage
Prepare supplies first. Then work calmly and methodically, keeping layers smooth and tension even. Stop and reassess circulation at each step.
Prepare and clean: HOCl rinse, dry, and pad selection
Start by flushing the wound with an HOCl cleanser to gently reduce surface bioburden without stinging. For step-by-step technique, see Cleaning dog wounds with HOCl. Pat dry thoroughly. Choose a non-adherent contact pad sized to the wound margins. Gather soft padding to distribute pressure. Pre-tear elastic wrap segments to minimize fumbling during application.
Layering order: contact layer, padding, elastic wrap
Place the non-adherent pad directly on the wound. Add even padding around the limb, focusing on bony prominences. Finish with the elastic wrap in overlapping spirals, moving distal to proximal. Evidence from surgical dressing protocols supports layered construction to maintain coverage while mitigating focal pressure points[2]. Smooth wrinkles as you go to prevent pressure ridges.
Tension checks: two‑finger rule and toe capillary refill
Aim for firm, even compression, not constriction. Use the two-finger rule: you should slide two fingers under the wrap. Press a toe pad until blanching, then release; color should return within two seconds. Excessive dog leg bandage tension raises ischemic risk with elastic materials[1]. Recheck after 15–30 minutes as the wrap settles.
Rotation timing: change intervals and wash cycles
Change the bandage at least every 24 hours, sooner if damp or soiled. Plan to rotate dog bandage components to keep materials dry and clean. Sub-bandage pressures can shift after reapplication and with movement, warranting frequent reassessment[4]. Machine-wash reusable wraps on gentle, then air-dry fully before reuse to maintain elasticity.
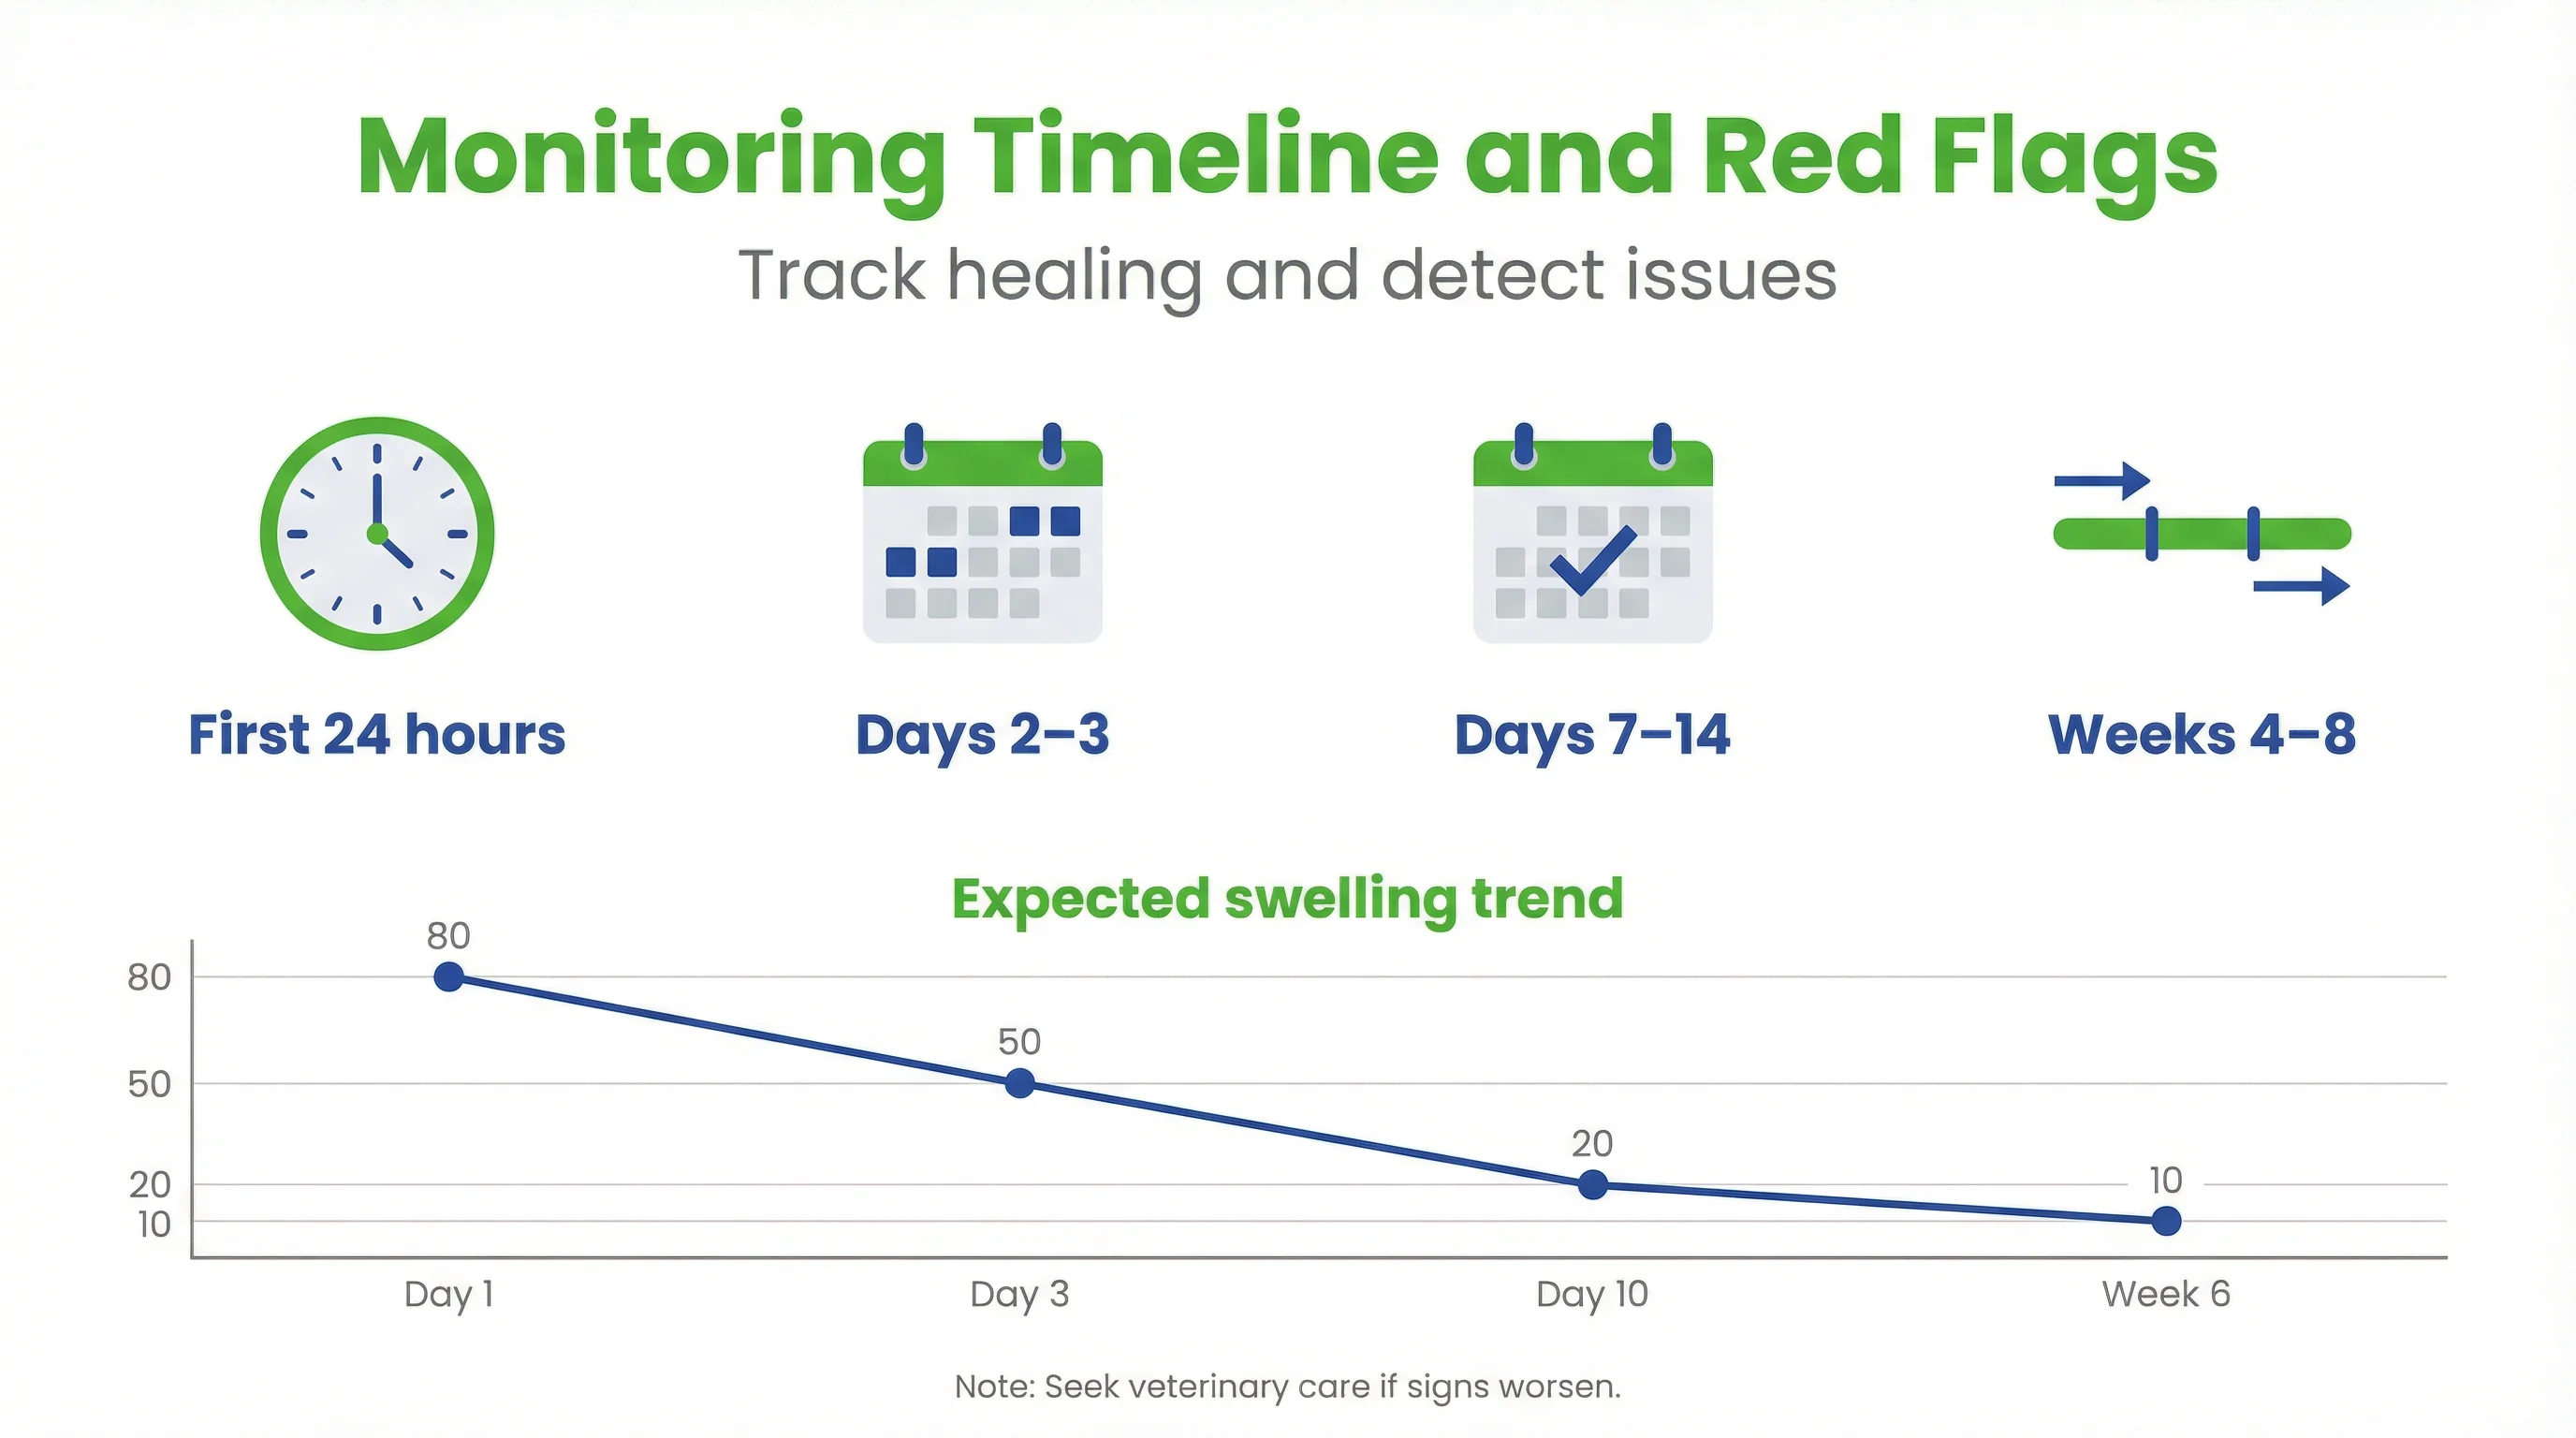
Monitoring: What to watch at 7–14 days and 4–8 weeks
Bandages are temporary. Track short-term healing, then evaluate longer-term function and skin health to decide when to wean support.
Short‑term signs of healthy healing vs. complications
Healthy signs include reduced redness and swelling, a dry wound surface, and normal toe warmth. Complications may include malodor, increased discharge, hot spots under padding, or escalating lameness. If the bandage leaves indentations or causes fur loss, reduce compression. Reassess fit and padding promptly to prevent pressure injury[1].
Longer‑term outcomes: mobility, skin integrity, recurrence
By four to eight weeks, most minor soft-tissue injuries should show improved gait and stable skin. Watch for recurring swelling after activity, which may indicate insufficient rest or wrap pressure issues. Evidence suggests pressure profiles change over time and with limb motion, so ongoing adjustments reduce risk[4].
Practical safety boundaries
Define clear guardrails for wear time, moisture, and activity. When in doubt, choose lighter compression and more frequent changes.
Maximum wear times, moisture control, and activity limits
Do not leave elastic wraps on longer than 24 hours without a full check. Keep bandages dry; water wicks pressure into skin folds and macerates tissue. Use a waterproof boot outdoors and remove it indoors. Limit high-impact play; controlled leash walks are safer during early recovery. For guidance on outdoor protection options, see dog boots for recovery.
Red flags that warrant stopping and calling your vet
Stop immediately if the limb cools, toes swell, or your dog cries when the limb is touched. Thick, discolored discharge or foul odor suggests infection. If the wrap repeatedly slips or causes sores, discontinue and seek veterinary advice. Persistent or worsening lameness also requires evaluation.
Evidence status and best‑practice notes
Research supports careful pressure management and layered bandaging, but individual responses vary. Apply principles conservatively at home.
What veterinary guidance suggests about elastic wraps
Veterinary texts caution that elastic materials can create high focal pressure, risking ischemia on conical limbs without proper padding and frequent checks[1]. In vitro testing shows bandage mechanics shift under bending and cyclic loading, emphasizing consistent, distributed padding[3]. After reapplications, sub-bandage pressures may change, reinforcing the need for serial reassessments[4].
Where evidence is limited and how to reduce risk
Few controlled trials define exact home-use pressures or change intervals. Reduce risk by using non-adherent contact layers, generous padding, and regular neurovascular checks. Assemble a simple home kit to keep supplies consistent; see how to build a dog first-aid kit. Document wrap times, observations, and changes.
Tools and fit tips for Healers‑style wraps with gauze inserts
Choose tools that simplify correct layering and tension management, especially when you are new to bandaging.
Sizing, paw protection pairing, and hot/cold pack use
Select a wrap sized to the limb’s narrowest circumference to avoid slippage. Pair with a protective boot outdoors to prevent moisture and debris contamination. Many pet owners find Healers Elastic Wrap Leg Bandage (with Gauze) helpful for this task. For swelling, apply a cold pack over padding for 10 minutes, then recheck circulation. Use heat only when advised by your veterinarian.
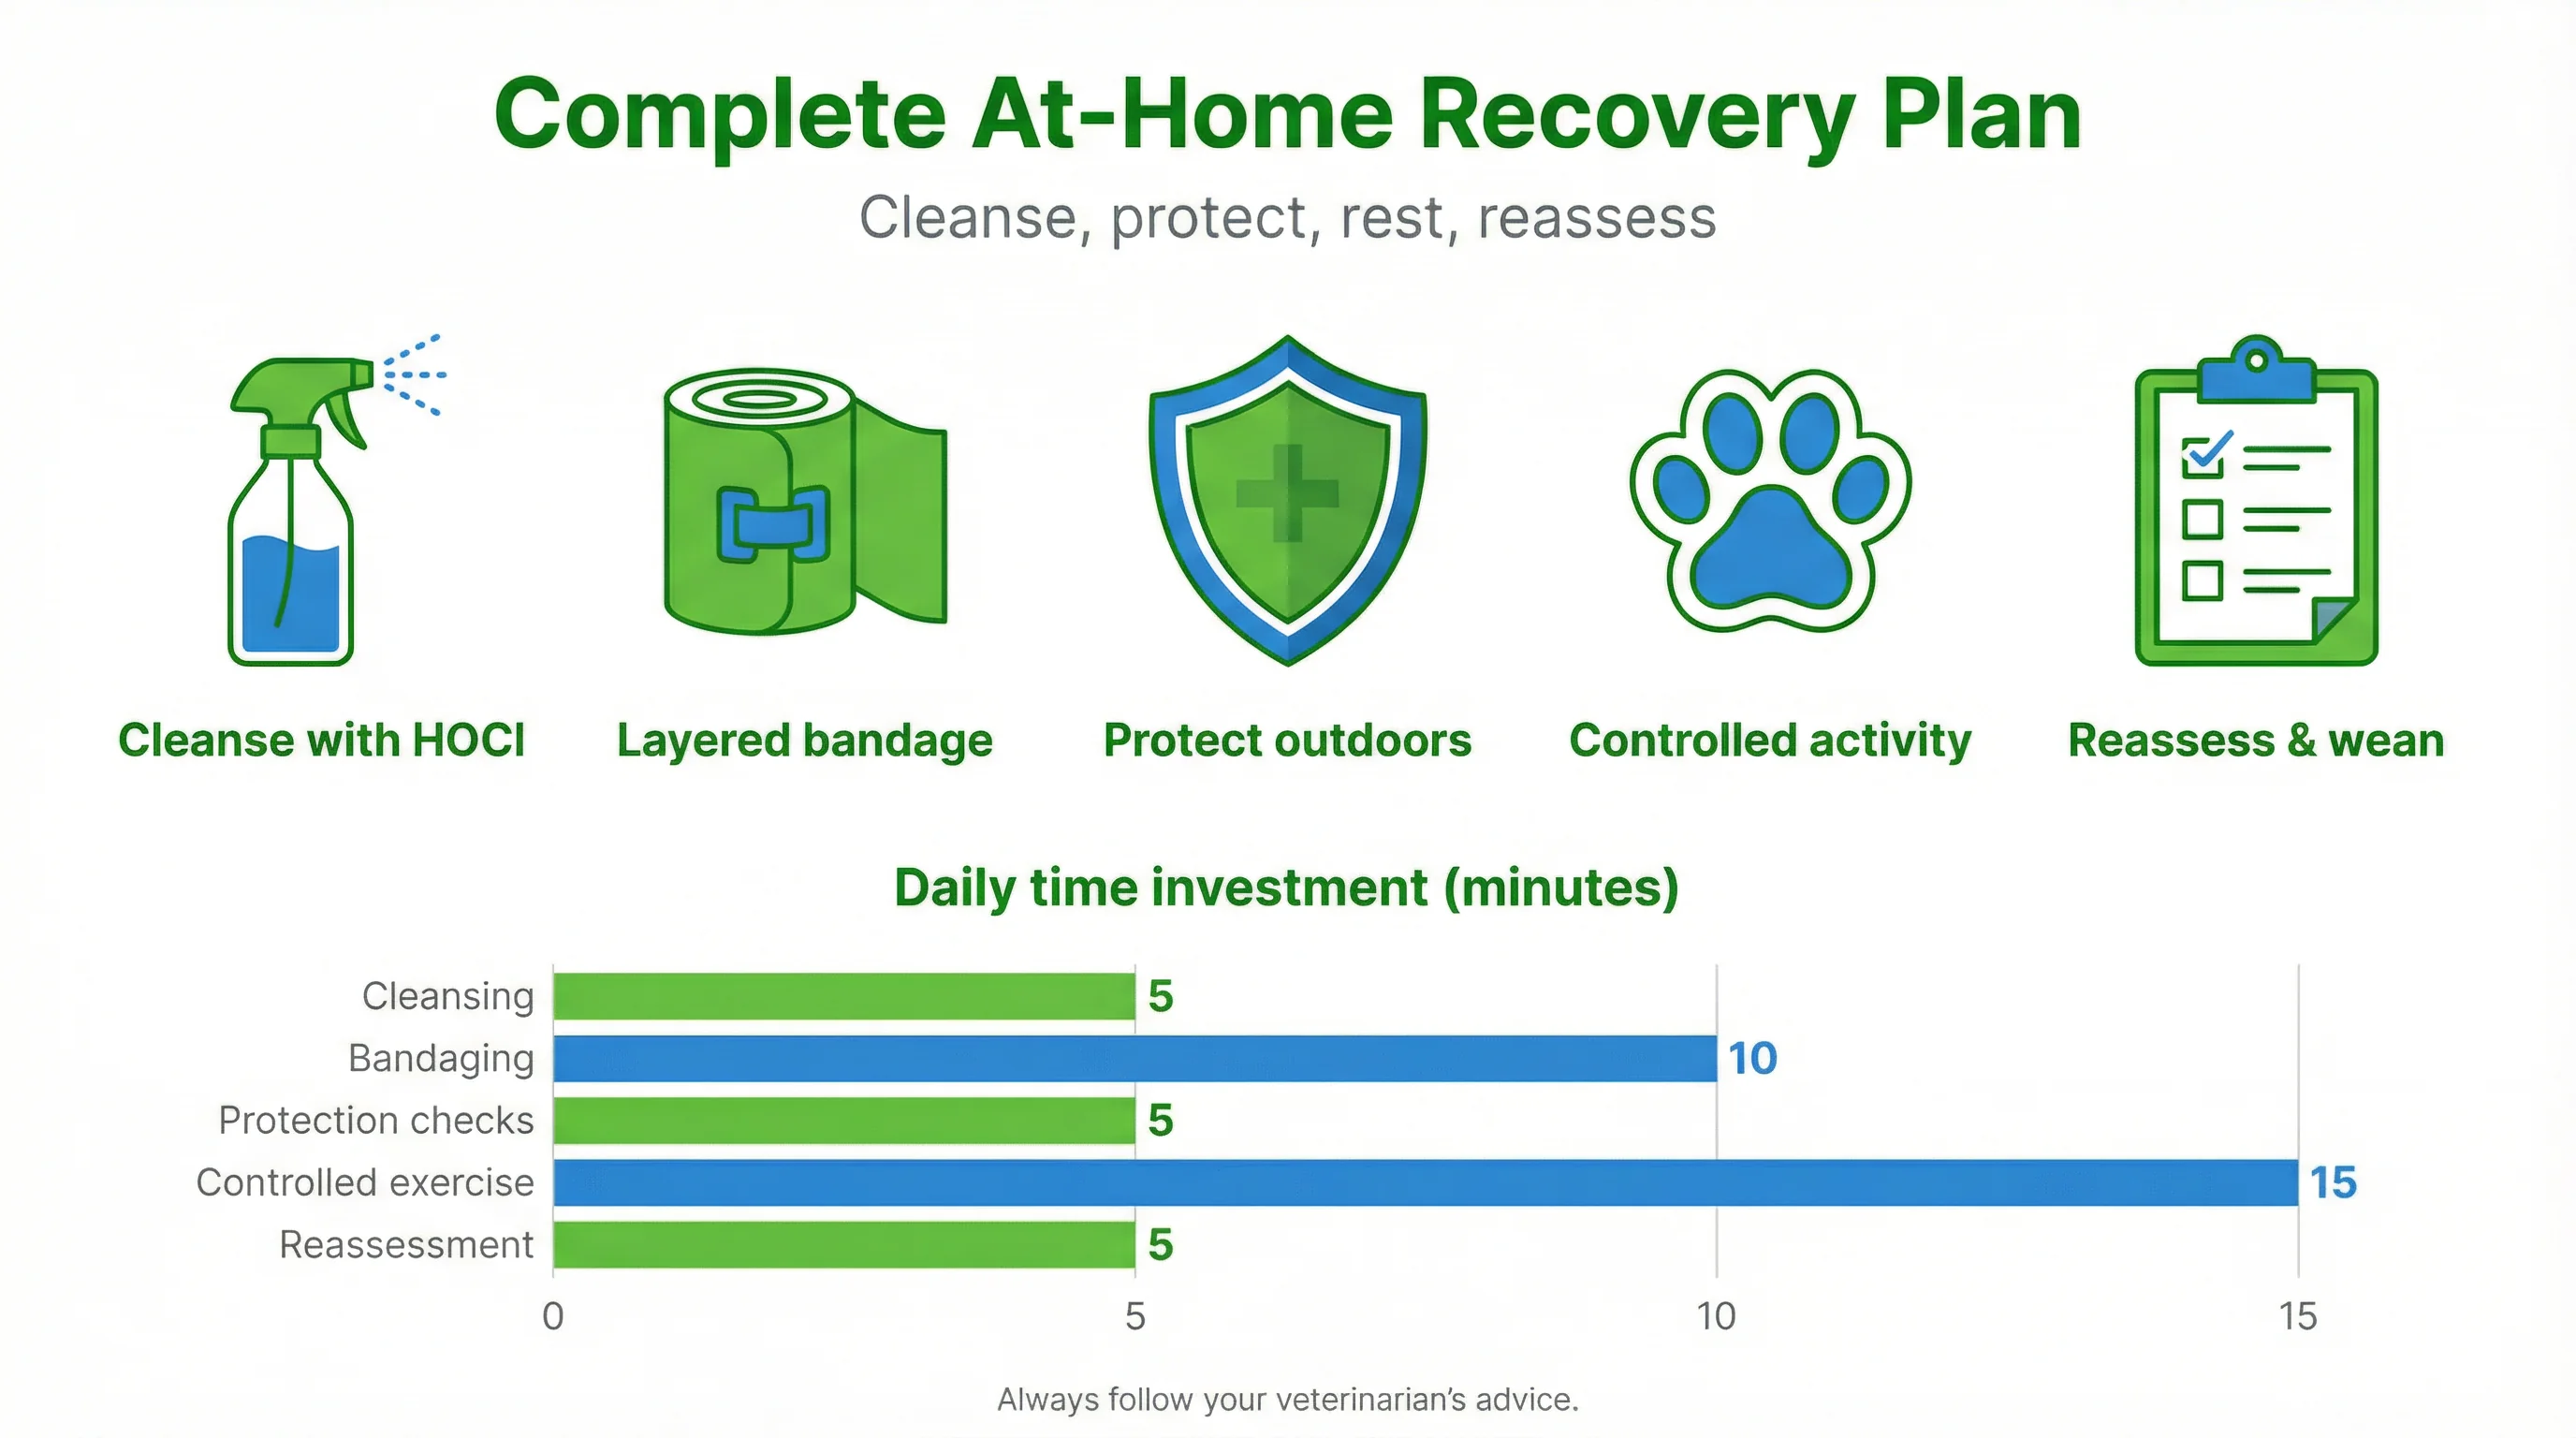
How this fits into a complete recovery plan
Bandaging is one element of a broader strategy including cleansing, protection, rest, and gradual return to activity.
Bandaging alongside cleansing, protection, and rest
Combine a consistent HOCl cleansing routine, layered bandaging, and controlled exercise restrictions. Protect the wrap during outings and reassess after each walk. For context on pacing, see our injury recovery overview. During seasonal extremes, traction and surface heat may affect paws; review seasonal paw hazards to plan safe routes.
Frequently Asked Questions
How tight should a dog’s elastic leg bandage be?
Aim for firm, even pressure that allows two fingers to slide under the wrap. Check toes every 15–30 minutes initially for warmth and normal color; loosen if cool, pale, or swollen.
How often should I change my dog’s leg bandage?
For clean, dry wounds, change at least every 24 hours; sooner if the gauze becomes wet or soiled. After activity or outdoor exposure, reassess immediately and replace if damp.
Can I use elastic bandages on joint sprains?
They may provide light support, but sprains vary. Evidence suggests controlled compression and rest can help; confirm severity with a veterinarian to avoid masking a more serious injury.
What should I put under the elastic wrap?
Use a non‑adherent contact layer on the wound, then soft padding to distribute pressure, followed by the elastic wrap. Avoid adhesive directly on fur or the wound bed.
When should I stop bandaging and see a vet?
Seek care if pain increases, discharge becomes thick or foul‑smelling, toes swell or cool, your dog chews the wrap repeatedly, or the wound hasn’t improved within 48–72 hours.
Conclusion
A washable elastic leg bandage for dogs can protect minor wounds and offer gentle support when applied with the correct layers, tension, and monitoring. Prioritize non-adherent contact materials, even padding, and frequent neurovascular checks. Rotate and replace wraps promptly, and keep them dry. Use caution with compression, and escalate care if red flags appear. With measured technique and vigilant observation, home bandaging may support comfortable, steady recovery while you stay aligned with veterinary guidance.
References
- S Bleakley (2024). Principles of External Coaptation. Techniques in Small Animal Soft Tissue …. View article
- P Berni et al. (2021). Case Report: A Novel Ventilated Thermoplastic Mesh Bandage for Post-operative Management of Large Soft Tissue Defects: A Case Series of Three Dogs Treated …. Frontiers in veterinary …. View article
- S Larcheveque et al. (2025). Mechanical characterization of the Robert Jones bandage under cyclic compression-bending: An in vitro experimental model. Research in Veterinary …. View article
- B Thibodaux et al. (2024). Sub-bandage pressure changes in canine hindlimbs after re-application of custom rigid fiberglass splints. BMC Veterinary Research. View article


